Set the Anti-Malware Modes
Anti-Malware settings in your sensor policy control the different parts of the Cybereason Anti-Malware protection, including signature and artificial intelligence analysis and Anti-Malware scans, Behavioral document protection, and Variant file prevention.
Note
Cybereason recommends that you create separate policies for sensors that require different Anti-Malware settings, rather than configure individual sensor settings to overwrite a common policy. See Sensor Policies for details on managing policies.
For supported operating systems for different Anti-Malware features, see Endpoint machine prevention features.
In this topic:
Enable Anti-Malware
Before you can configure Anti-Malware settings, you must enable Anti-Malware.
To configure Anti-Malware, follow these steps:
In your sensor policy, navigate to the Anti-Malware screen. All options are disabled by default.
At the top of the Anti-Malware screen, set the toggle to On.
Set Anti-Malware Signatures mode
Anti-Malware Signatures mode enables the Cybereason platform to analyze signatures of files on endpoint machines and compares these signatures against the databases of known problematic signatures.
Important
The Cybereason platform supports use of the Anti-Malware Signatures mode feature as a single Anti-Malware tool, with no third-party antivirus tools running in parallel. If you are using a third-party antivirus tool, you must disable Anti Malware > Signatures mode.
To configure Signatures mode, follow these steps:
In your sensor policy, in the Anti-Malware screen, locate the Signatures mode section.
In your sensor policy’s Anti-Malware screen, locate the Signatures mode section, and then select the mode that you want:
Mode
Description
When to use this setting
Disabled
Disable and uninstall Signature mode (default)
You want to use Cybereason alongside a third party antivirus.
Detect
Detect malware but take no further action on the endpoint. Send a malware alert to the Cybereason UI.
Use this mode for testing purposes only, as it does not provide standard antivirus protection.
Prevent
Prevent malicious files from executing, but do not modify or move them from their location.
Note
Old sensors that do not support Prevent mode are set to Detect mode.
You want to use Cybereason as your antivirus tool and prevent malware from executing, but you do not wish to change or move prevented files.
Quarantine
Move a malicious file to a different location to prevent it from executing.
Quarantined files are placed in the following folder location:
Windows: C:\ProgramData\apv2\Quarantine
Mac: /usr/local/cybereason/Quarantine
Cybereason does not allow you to retrieve these files from the Cybereason UI.
Note
Sensors using versions earlier than 20.1.222 do not support Quarantine mode. Therefore, the Signatures mode for these sensors is set to Prevent.
You want to use Cybereason as your antivirus tool, and you wish to prevent and quarantine malicious files.
Disinfect
Detect malware and disinfect malicious files. If malicious files cannot be disinfected, the malicious files are completely removed from the machine and are not quarantined.
You want to use Cybereason as your antivirus tool, and you wish to disinfect or remove malicious files.
Below the Signatures mode section, locate the Set advanced configuration options section, and configure any of the following options, as needed.
Note
The Set advanced configuration options in the Anti-Malware screen of the sensor policy is not visible by default. To display this section, open a Technical Support case.
Mode
Description
Default value
Operating System
When to use this setting
Update frequency
Determine how frequently sensors download signature updates to the endpoint.
To set the frequency level, type a value between 15 minutes and 1440 minutes (24 hours).
15 minutes
Windows 7, Windows Server 2008 SP2 and above
macOS 10.10 and above
Cybereason recommends that you use the default frequency value (15 minutes). However, you may choose to increase the frequency value in scenarios where a significant load on disk resources is expected. For example, in a VDI environment, Cybereason performs simultaneous updates on a large number of machines, which may significantly affect local disk resources, even when a local update server is used.
Important: Cybereason Anti-Malware > Signatures mode performs updates every few minutes. Therefore, where you increase the frequency value, this may affect the level of protection Cybereason provides.
Ignore network paths
Disable scanning of network paths.
Enabled
Windows 7, Windows Server 2008 SP2 and above
Use this option to avoid scanning each file on the drive, which improves performance. For example, if you have a network drive mapped to 200 machines, you can use the Ignore network paths option to avoid scanning each file on the drive upon every read.
Limit file extensions
Limit scanning of file types.
When the Limit file extensions option is enabled, Cybereason only scans specific file extensions that may include malware or malicious content.
Note
The Limit file extensions option does not apply to on-access scans. If an execute attempt is detected, Cybereason scans the file regardless of the file type.
Enabled
Windows 7, Windows Server 2008 SP2 and above
When you enable the Limit file extensions option, Cybereason only scans files that the operating system may automatically load, run, or execute during a malicious operation, such as .exe, .dll, or .docx.
When you disable the Limit file extensions option, Cybereason scans all file types. While scanning all file types provides an extra level of caution, this option might affect resource consumption.
Share telemetry data
This feature is available from version 23.2.65 and later. When enabled, the sensor reports file metadata to Cybereason headquarters for analysis that will impact the accuracy rate of our Anti-Malware engines and help reduce false positives.
Enabled
Windows and Linux
To help reduce false positives.
Scan archives
Enable scanning of archive files (this includes any compound file type, such as .zip, .rar, .chm, installer files, etc.). For this option to work, disable the Limit file extensions option.
Disabled
Windows 7, Windows Server 2008 SP2 and above. All supported Mac and Linux versions.
Use this option in a scenario where Cybereason scans all file types (Limit file extensions is disabled), to ensure that Cybereason scans .zip files specifically.
Disable USN Journals
Note
This configuration setting is not available by default. Contact your Cybereason representative to activate this setting.
USN Journal is a Windows OS feature that allows Cybereason Anti-Malware to track changes in the file system and optimize the scanning performance. Click the checkbox to disable the Cybereason platform utilization of the USN Journals feature.
Unchecked (USN Journals utilization is enabled)
Windows 7, Windows Server 2008 SP2 and above
You may select to disable USN Journals utilization to avoid possible performance issues for other applications on the endpoint machine, or if you intend to use USN Journals for a purpose other than Anti-Malware.
On access scanning
Perform on access scans.
Enabled
Linux and macOS
On access scans can sometimes impact performance. If necessary, you can uncheck this option to disable on access scans on Linux and macOS machines. Note: If you change this setting, it is recommended to wait ~5 minutes to allow the change to take effect.
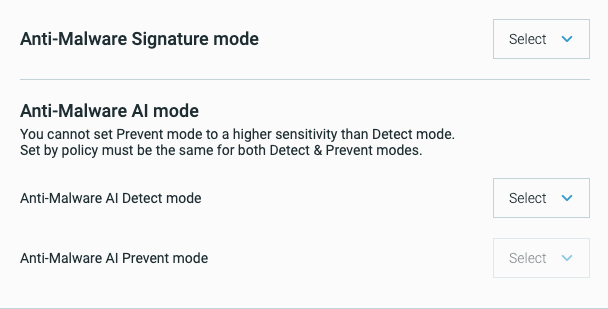
Set Artificial Intelligence mode
After you set the level for Signatures mode, you can configure the Artificial Intelligence mode. This mode enables Anti-Malware to use behavioral detection techniques based on machine learning and artificial intelligence to supplement signature-based detection of malware.
To configure Artificial Intelligence mode, follow these steps:
In your sensor policy, in the Anti-Malware screen, below the Signatures mode section, locate the Artificial Intelligence section.
For the Detect mode option, select the sensitivity that you want:
Mode
Description
When to use this setting
Disabled
Disable AI Detect mode (default).
You do not want to use artificial intelligence to detect malware. (Not recommended - you may miss malware on the endpoint.)
Cautious
Detect the execution of only those files that Cybereason determines are malware with a very high level of certainty. This is the setting with the lowest sensitivity.
You want to detect malware, but want to avoid handling many false-positive results.
Moderate
Detect the execution of only those files that Cybereason determines are malware with a high level of certainty.
You want to detect malware, and can tolerate handling some false-positive results.
Aggressive
Detect the execution of any files Cybereason determines are likely to be malware. This is the setting with the highest sensitivity.
You want to detect malware. You prefer to assess and analyze all false positives, as well as processes that are likely, but not certain, to be legitimate.
For the Prevent mode option, select the sensitivity that you want:
Mode
Description
When to use this setting
Disabled
Disable AI Prevent mode (default).
You do not want to use machine learning to prevent malware. (Not recommended - malware may execute on the endpoint.)
Cautious
Prevent the execution of only those files that Cybereason determines are malware with a very high level of certainty. This is the setting with the lowest sensitivity.
You want to prevent malware, but want to avoid false-positives. You do not want to prevent the execution of processes that are very likely to be legitimate.
Moderate
Prevent the execution of only those files that Cybereason determines are malware with a high level of certainty.
You want to find and prevent malware, and can tolerate handling some false-positives. You do not want to prevent the execution of processes that are very likely to be legitimate.
Aggressive
Prevent the execution of any files Cybereason determines are likely to be malware. This is the setting with the highest sensitivity.
You want to prevent malware aggressively, even if they may be false positives. Note: If you select this mode, it’s not possible to select the ‘Quarantine’ option, as this mode may cause numerous false positives, and reverting the quarantine of numerous false positives may cause issues.
Quarantine malicious files
Quarantine files prevented by Artificial Intelligence. Quarantined files are stored in the same location as files quarantined from MalOps. See Remediation options for details.
Selecting this option increases security by preventing further use of the file after first prevention, and enables security personnel to analyze files that were prevented by this feature and restore them manually if needed.
Note
You cannot set AI Prevent mode to a higher sensitivity than AI Detect mode.
Set the Variant File Prevention mode
Note
This feature is available from version 23.1.8x and higher. The feature is disabled by default and is in beta status. Open a Technical Support case to enable this feature.
You can set the Variant File Prevention mode as follows:
Mode |
Description |
|---|---|
Disabled |
Do not use Variant File Prevention to prevent malicious files from executing. |
Detect |
Detect and report malicious files when executed. Trigger MalOps with information on the malicious content that was detected. |
Prevent |
Detect and report malicious files when executed and prevent them from running. Trigger MalOps with information on the malicious content that was prevented. |
Quarantine |
Detect and report malicious files when executed, prevent them from running and quarantine the file. Trigger MalOps with information on the malicious content that was quarantined. |
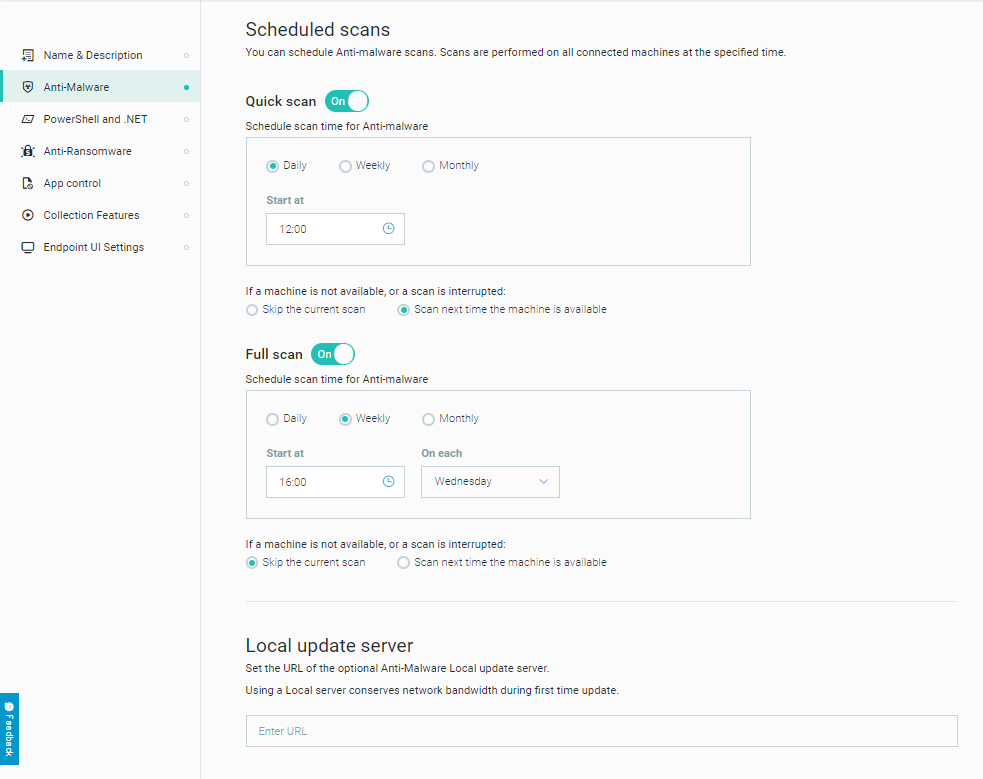
Configure scan properties
Scheduled scans can improve your endpoint security and enable you to comply with security regulations. Scans are performed on all connected machines at the specified time according to the time on the local machine. Administrators can view the last time a scan was completed in the System > Sensors screen.
Users on endpoint machines can also run scans directly. For more information, see System tray icon - Signatures scan actions and details.
You can select from these different types of scans:
Option |
Description |
When to use this setting |
|---|---|---|
Quick scan |
Scans processes in memory and the registry. |
You want scan process but not utilize a great deal of CPU. Note: During quick scans, if a malicious process is found and is currently running, it will only be killed (and the file deleted) if Anti-Malware > Signatures mode is set to ‘Disinfect’. |
Full scan |
Scans all files on the disk (meaning locally connected hard drives). Note that users may experience higher CPU usage during the initial stage of a full scan, so it is best to schedule full scans during off hours. |
You want to perform a comprehensive scan of all files, and you have time and resources to encounter high CPU usage. |
To configure scan properties, follow these steps:
In your sensor policy, in the Anti-Malware screen, locate the Scheduled scan section.
In the Scheduled scan section, set the toggles for Quick scan and Full scan to On as needed.
Below each type of scan, if needed, select one of the following frequencies:
Daily
Weekly
Monthly
In the Start at option, click in the edit field that shows the time and enter the time to start the scan.
Above the Scheduled scan section, locate the Set advanced configuration options section.
Note
The Set advanced configuration options in the Anti-Malware screen of the sensor policy is not visible by default. To display this section, open a Technical Support case.
Select or clear the Ignore network paths option to enable or disable the scanning of network paths on a machine.
Enabling this option improves the scan performance. For example, if you have a network drive drive mapped to 200 machines, use this option to avoid scanning each file on the drive upon every read.
Select or clear the Limit file extensions option to enable or disable the scan for specific file extensions known to include malware or malicious content.
If you enable this option, Cybereason only scans files that the operating system may automatically load, run, or execute during a malicious operation, such as an .exe, .dll, or .docx file.
If you disable this option, the sensor scans all file types. Scanning all file types provides an extra level of caution but may affect sensor resource consumption.
Select or clear the Scan archives option to enable or disable the scan of .zip files.
Note
You must disable the Limit file extensions option if you enable this option.
The optional NGAV Local update server conserves network bandwidth during the first update of the sensors’ Anti-Malware signature database. If you do not have an NGAV Local update server, you can leave this field empty. If sensors cannot connect to the Local update server, or if there is no Local update server, the sensors will connect to the NGAV Global update server. See NGAV Local Update Server for more details.
Configure Anti-Malware for individual sensors
You can configure Anti-Malware for individual sensors from the System > Sensors screen.
In the System > Sensors screen, select the sensors whose Anti-Malware modes you want to set.
Above the sensor list, click Actions and select Set Anti-Malware modes from the menu.
In the first pane of the wizard choose how you would like to configure the Anti-Malware modes for the selected sensors:
Set by Policy
Enabled
Disabled
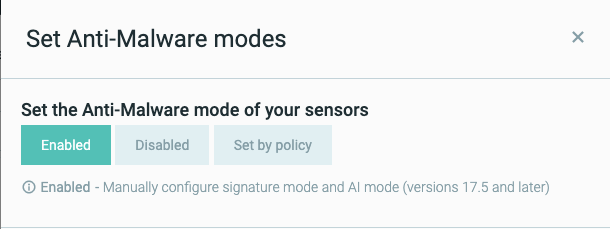
If you select Enabled, you must specify settings for the Signatures mode, AI Detect mode, and AI Prevent mode in the list that opens.
Configure Anti-Malware with installation parameters
Use the sensor installation command parameters to set the Anti-Malware modes during installation or during an upgrade. When you upgrade sensors from a Cybereason version that did not support sensor-level configuration, the sensors will retain their Anti-Malware settings.
When you first install the sensor, or when you upgrade the sensor, the sensor may have to connect to Cybereason servers before the Anti-Malware modes become available.
You can use installation parameters to set the following sensor-level Anti-Malware modes.
Parameter |
Description |
Values |
|---|---|---|
ANTI_MALWARE |
Value specifying whether to enable or disable Anti-Malware. |
|
AP_AV_MODE |
Value specifying how to set Anti-Malware Signature mode. |
|
AP_SA_DETECT_MODE |
Value specifying how to set AI Detect mode. |
|
AP_SA_PREVENT_MODE |
Value specifying how to set AI Prevent mode. |
Note that you cannot set this value to a higher sensitivity than the AP_SA_DETECT_MODE parameter. |
If you send an invalid set of parameters for these modes, the sensor ignores the invalid parameters and the sensors maintain their previous configuration. If no prior configuration exists, the sensor applies the Set by Policy setting.
View Anti-Malware modes
In the System > Sensors screen, you can confirm whether specific sensors have the desired configuration for Anti-Malware features.
The Anti-Malware mode, Signatures mode, AI Detect mode, and the AI Prevent mode columns represent the sensor’s respective Anti-Malware mode setting.
The following table describes the Anti-Malware mode columns in the UI Sensors screen that you can use for troubleshooting purposes, along with their possible values and descriptions.
Column name |
Values |
Description |
|---|---|---|
Signature mode |
||
Initializing |
The Cybereason platform is in the process installing the Signature mode on the sensor. |
|
Not supported |
Signature mode is not supported on this sensor. |
|
General error |
Cybereason encountered an error. |
|
Reboot required |
Restart your sensor to apply the Signature mode. |
|
Other AV found |
Cybereason detected an additional third-party antivirus program. |
|
AI Detect and Prevent mode |
||
Not available |
Information about the AI Detect and Prevent mode is not available for this sensor. |
For sensors with the Legacy Configuration policy, the Anti-Malware mode origin, Signatures mode origin, AI Detect mode origin, and the AI Prevent mode origin columns are populated. The origin columns represent the origin of the current setting, such as “Set Manually” if the current setting was set in the UI specifically for this sensor.
For sensors that have the Legacy Configuration policy, each of the mode origin columns can have one of the values listed in the following table. The origin columns are empty for sensors that have the Default policy or any user-defined policy.
Values for mode origin column |
Description |
|---|---|
Set by Policy |
The setting comes from the Legacy Configuration policy (settings specified on the Sensor policy screen in previous versions). |
Set Manually |
The setting was configured manually from the sensors screen actions, personalization commands, or installation parameters. Exceptions override the policy for the specific sensor. |
Awaiting update |
The Cybereason server is awaiting a response from the sensor. This value also appears:
Because Cybereason is waiting for a response, the value in the mode column may not be accurate. |
Not available |
Information is not provided by legacy sensors (sensors running a version previous to 17.6.50). |
Help us improve our accuracy
To help improve the accuracy of our Anti-malware engines and reduce false positives, the sensor can report file metadata to Cybereason headquarters for analysis. Contact Support to enable this feature, which is available from version 23.2.4x.