Assign Sensor Policies
System and policy administrators can assign security settings to sensors or sensor groups in their organization in multiple ways.
In this topic:
Assign policies to sensor groups
To better manage your security policies, Cybereason recommends assigning sensor security policies to specific sensor groups.
Note
You cannot assign a policy to the group of Unassigned sensors.
You assign an existing policy when you create or edit group settings from the System > Groups screen by selecting a policy from the Policy assignment menu. The policy you select will be applied to all sensors in that sensor group. Any individual sensor settings will be overridden.

Assign policies to individual sensors
You can assign a policy to an individual sensor under the following circumstances:
The sensor is in the Unassigned group
The sensor’s group does not have an assigned policy
If a sensor is part of a group with an assigned policy, you must remove the sensor from that group before assigning the sensor a different policy.
Assign policies to individual sensors in the Sensors screen
You can assign policies to individual sensors as needed in the Sensors screen.
To assign policies to one or more individual sensors, follow these steps:
In the System > Sensors screen, select the box next to the sensors to which you want to apply the policy. You can use the filter box or the quick filters to narrow down the list of sensors.
Click Actions, and then click Set policy.

In the Assign policy to sensors dialog box, select a policy from the drop down menu, and then click Continue.

Check Keep manual configuration if you want current sensor settings that were configured manually to override settings in the policy you are assigning.
In the next window, click Assign to sensors.
Note
The System > Sensors screen does not display values for the origin mode columns for sensors assigned the Default policy or any user-created policies. The origin mode columns only apply to the Legacy Configuration policy.
Assign policies to individual sensors on sensor installation
You can assign a sensor policy for the sensor when performing the installation. You assign this policy using installation parameters.
When installing new sensors, sensors are automatically assigned to the Default policy and have a compliance value of ‘True’. If you want to assign a new sensor to a specific policy, use the AP_POLICIES_INITIAL_POLICY_ID installation parameter.
The AP_POLICIES_INITIAL_POLICY_ID parameter accepts a policy ID string, which you can find in the Policy ID column on the System > Policies management screen. If no policy is specified, or if the policy ID does not exist, the sensor is assigned the Default policy.
The following example shows how to assign a specific sensor security policy at installation:
<installer file name> /install /quiet /norestart -l
C:\\Temp\\CybereasonInstall.log AP_POLICIES_INITIAL_POLICY_ID=88f78f3b-c589-44ba-bd2
Note
If you install the sensor, then uninstall it, then install it again with a pre-defined policy, the command line configuration cannot override the original policy configuration, as this persists in the database. In this case, use the UI to make changes to the sensor policy.
See Supported sensor installation parameters for more information on the policy installation parameter.
Assign policies on upgrade
The sensor update process may differ between organizations and depend on customer needs. The following examples outline deployment steps in various scenarios. We recommend contacting Customer Success for guidance.
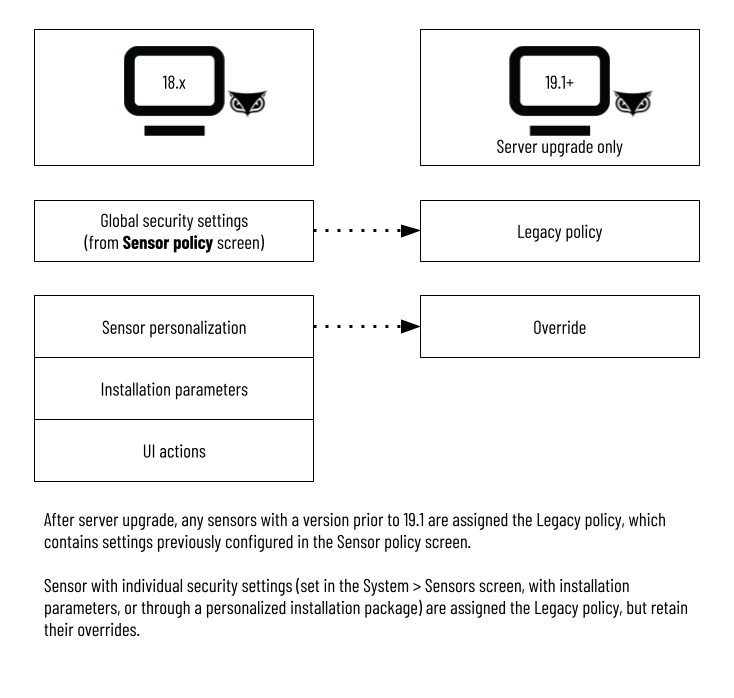
Upgrade only pre-19.1 servers to version 19.1 or later using installation parameters
The following graphic shows the workflow for upgrading servers via the installation parameters. Upon upgrade, pre-19.1 sensors are assigned the Legacy policy, which reflects the settings on the (pre-19.1) Sensor policy page. Sensors retain any manually-configured settings.
Upgrade your Cybereason servers.
All sensors are assigned the Legacy Configuration policy, which includes settings previously configured on the Sensor policy screen in versions prior to 19.1. Sensors with individual settings retain the settings present at the time the server is upgraded. These sensors are considered non-compliant with their assigned policy. Continue the steps to make the sensors compliant with a policy.
In the System > Policies management screen, create one or more policies for security settings that sensors have that are not defined in the Legacy Configuration policy. For example, if Sensor A was manually overridden to enable Anti-Malware, while Anti-Malware was not set in the Sensor policy screen, create a policy where Anti-Malware is set (along with any other configurations needed), and assign Sensor A to that policy.
In the System > Sensors screen, select sensors whose settings you want to reflect a policy you created.
From the Actions menu, select Set policies.
In the Assign policy to sensors dialog box, select a policy from the drop down menu and then click Continue.
In the next window, click Assign to sensors.
Repeat steps 2 through 6 for all settings that apply to individual sensors.
Override policy settings (not recommended)
Administrators can customize security settings for individual sensors by overriding the settings the sensor receives from its assigned policy. You can modify security settings for individual sensors under the following circumstances:
The sensor is in the ‘Unassigned’ group
The sensor’s group does not have an assigned policy
Important
Cybereason recommends that you assign sensors to policies with specific settings, rather than manually apply override settings to specific sensors.
To override security settings on a specific sensor:
From the System > Sensors screen, select the check box next to the sensors whose security settings you want to customize. You can narrow down the list of sensors using the Filter box or the Quick filters.
Click Actions.
Select the security settings you want to customize for the selected sensor or sensors. The selected sensors adopt these new settings.