Manage Reputations
The Cybereason platform enables you to maintain a customizable private reputation list that specifies how the Cybereason platform classifies and item when the platform encounters a specific file hash, process, IP address, or domain in your environment. In addition, through the private reputatation list, you can instruct sensors how to respond if they encounter a specific file hash in your environment.
The private threat intelligence list enables you to better tailor the Cybereason platform’s threat intelligence-based analysis to your specific security needs. For example, if you have a legitimate program that the Cybereason platform classifies as malicious since your program may exhibit behaviors that resemble similar of malicious tools, you can add a custom reputation for the program that instructs the Cybereason platform to allow the program to run.
You can add up to 100,000 items to your reputation list. Adding more items can have negative performance impacts.
In this topic:
What items can you add to your private reputation list?
You can add custom reputations for the following items:
Item
Item type
Example
File
File hash (MD5, SHA-1, or SHA-256)
Note
To ensure that the Cybereason platform is able to allow or block SHA-1/SHA-256 hash values, you must have the Threat Intel service enabled in your environment. Contact your Customer Success Manager to enable this feature.
If you do not have the Threat Intel service enabled, the SHA-1 or SHA-256 file hash values are still prevented by the sensor, but the values are not added to te whitelist.
3f63e9f09fe59f5
Process
File hash (MD5, SHA-1, or SHA-256)
cc273fe9d442850
Domain (not including subdomains)
Domain
mydomain.com.
The platform triggers a MalOp for an exact match of the domain name, and does not trigger a MalOp for subdomains.
IP address
IP address
198.20.10.54
Reputation management options
You manage your custom reputation list from the Reputations screen. You can also set reputations for specific items during investigation using the Element details pane.
Likewise, if you use Cybereason XDR, XDR response actions may also add IP addresses to the blocklist automatically.
Note
The Cybereason platform currently maintains two versions of the Reputations screen in the UI.
The following table describes reputation options:
Desired Platform Response
How to configure
Description
Allow: Do not trigger a MalOp for this item
Perform one of the following:
Add the item using the Reputations screen and set Action to Allow
Add the item to a CSV file with whitelist in the reputation column
The item may appear in other MalOps if the item takes part in the malicious activity. For example, if a process in the reputation list injects into another process, a MalOp of type Injected Process may be generated.
Detect only: Trigger a MalOp for this item, but do not prevent it from executing
Perform one of the following:
Add the item using the Reputations screen and set Action to Detect Only
Add the item to a CSV file with blacklist in the reputation column and False in the Prevent execution column
The Cybereason platform creates a MalOp for all occurrences of the item currently in the environment, as well as all subsequent instances of the item. The item name appears as the root cause of the MalOps.
In environments with sensor grouping enabled, if you add a group assignment for this reputation, the Cybereason platform triggers a MalOp only if the item for the reputation is part of a sensor group to which you are assigned.
Detect and prevent: Trigger a MalOp for this item, and prevent it from executing
Perform one of the following:
Add the item using the Reputations screen and set Action to Detect & Prevent
Add the item to a CSV file with blacklist in the reputation column and True in the Prevent execution column.
You must have Application Control enabled to block items from executing.
In environments with sensor grouping enabled, if you add a group assignment for this reputation, the Cybereason platform triggers a MalOp only if the item for the reputation is part of a sensor group to which you are assigned.
Important
Be careful when setting reputations for critical applications such as cmd.exe, explorer.exe, and PowerShell. Detecting or preventing these applications may cause legitimate processes to trigger MalOps.
Note
Changing the reputation of an item will not affect the status of previously created MalOps. However, if the item is involved in other MalOps, the reputation update will be reflected in the details of new MalOps.
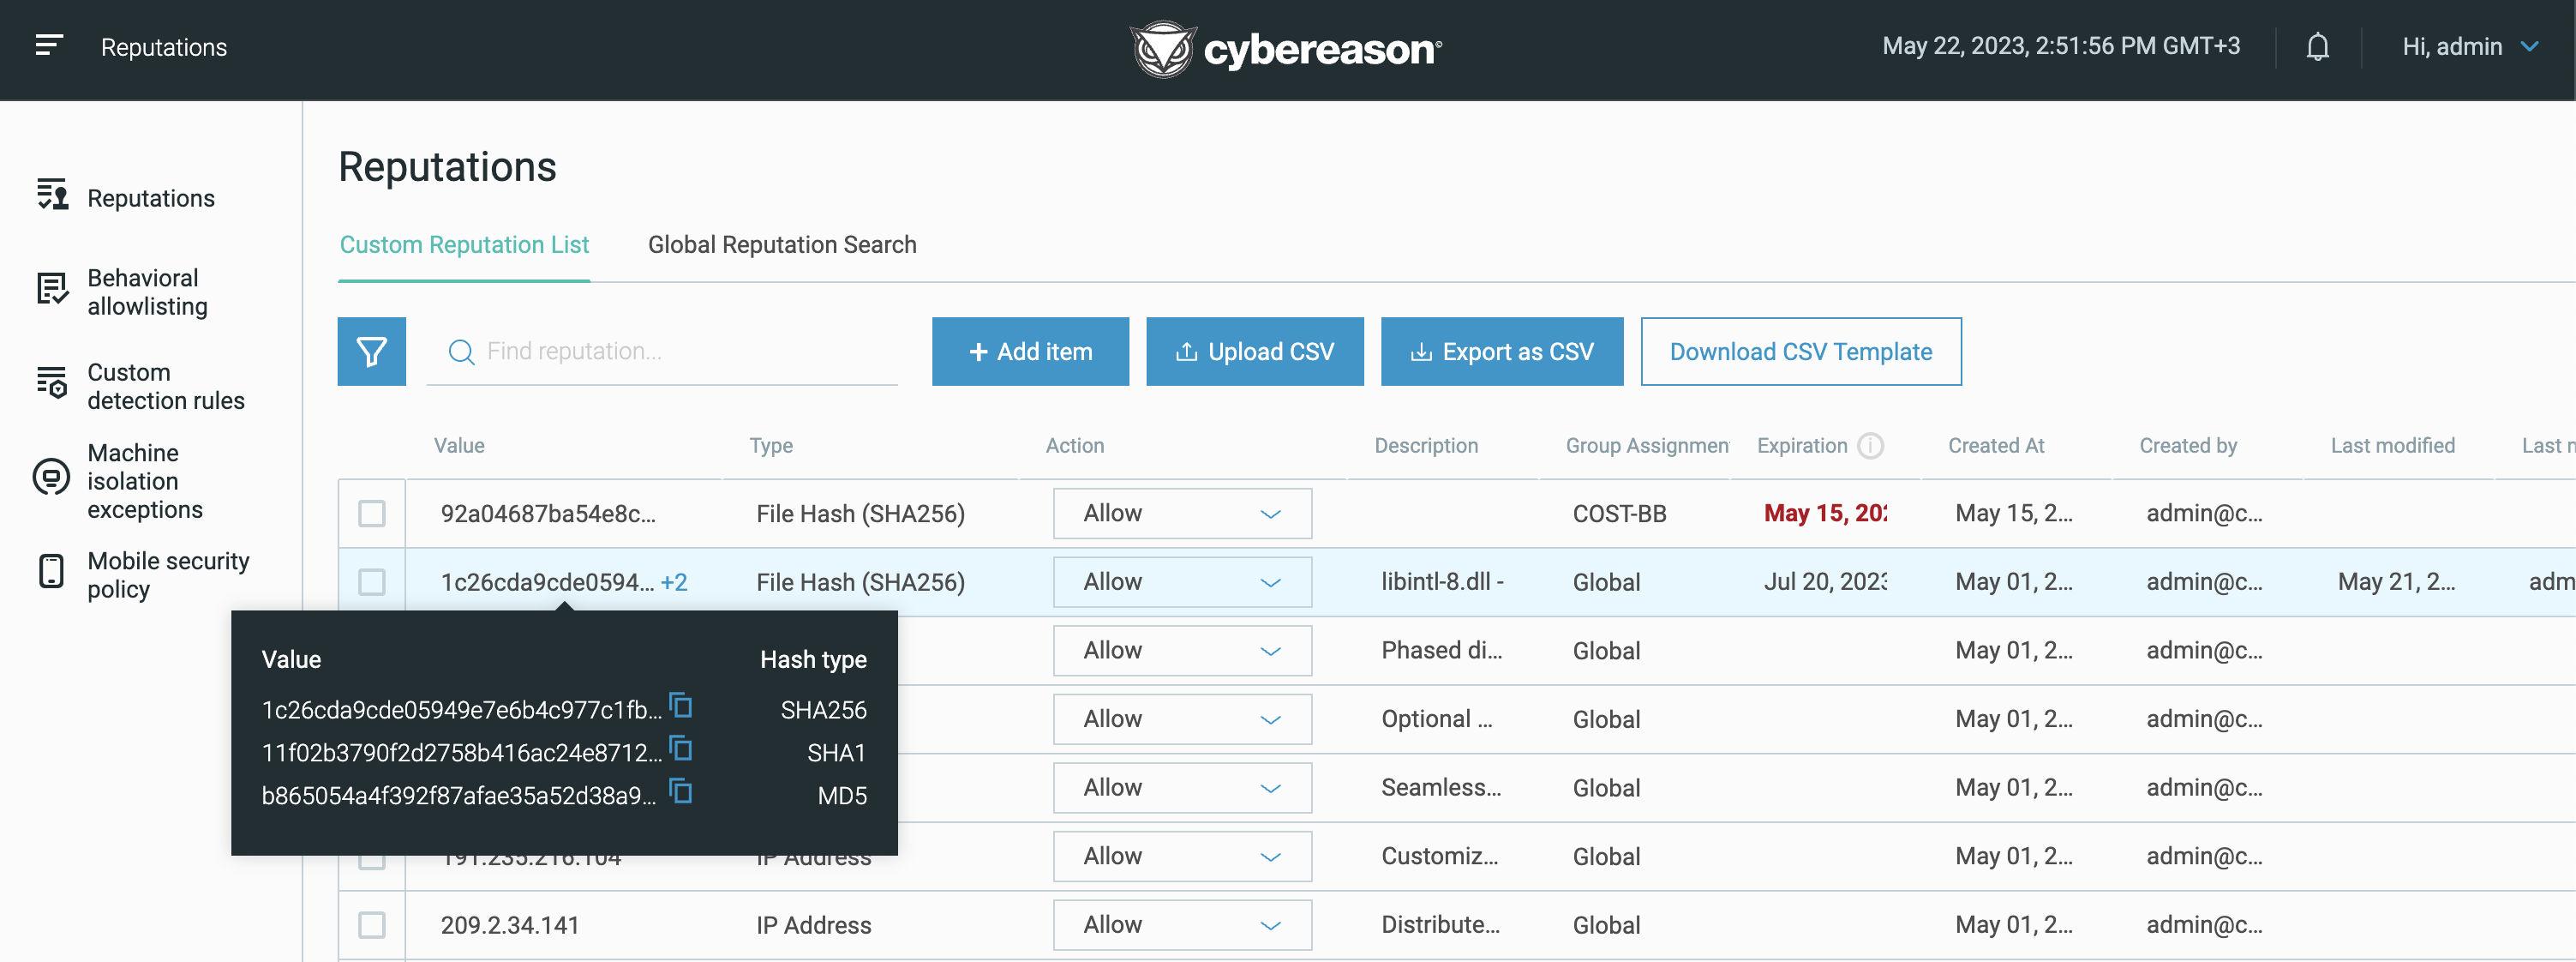
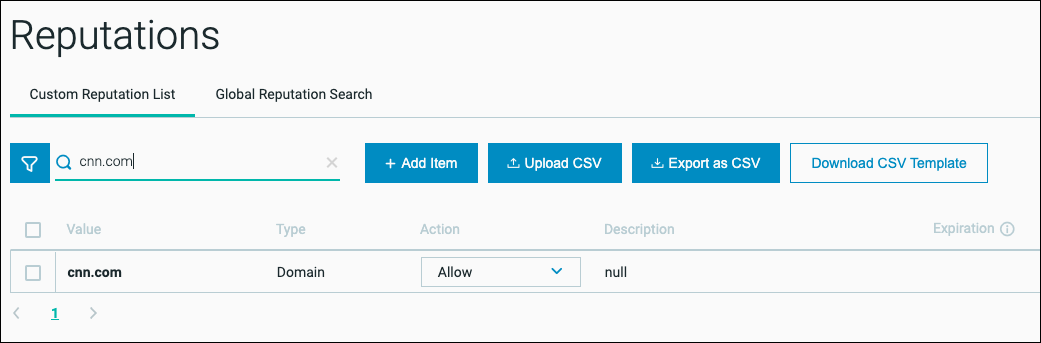
Manage reputations in the Reputations screen
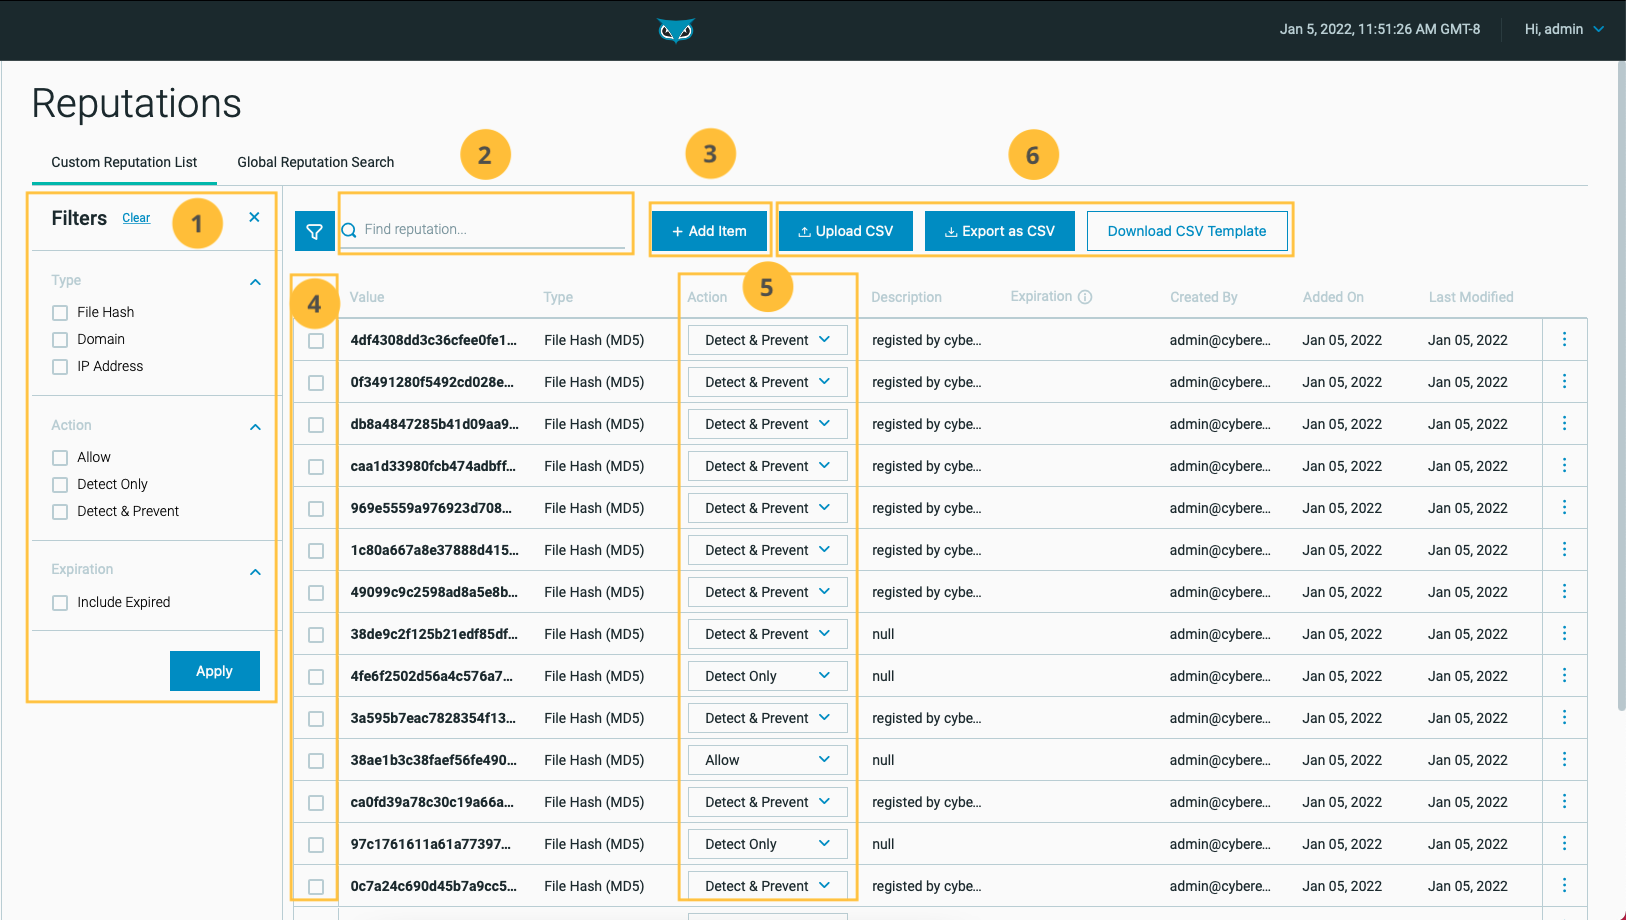
In the Custom Reputation List tab, you can perform the following tasks:
Filter by one or more of the following properties:
Property
Items to Update
Type
IP address
Domain
File Hash
Action
Allow
Detect Only
Detect & Prevent
Expiration
Active
Expired
Search your reputation list by value or description.
Add a new item.
Edit or delete an item.
Change a reputation using the EDR Action column.
Upload a CSV file, download a CSV template, or export the items to a CSV file.
Add an item
To add an item, such as an IP address or domain, to your private reputation list, follow these steps:
From the Reputations screen Custom Reputation List tab, select Add item. The Add Reputation Item window appears:
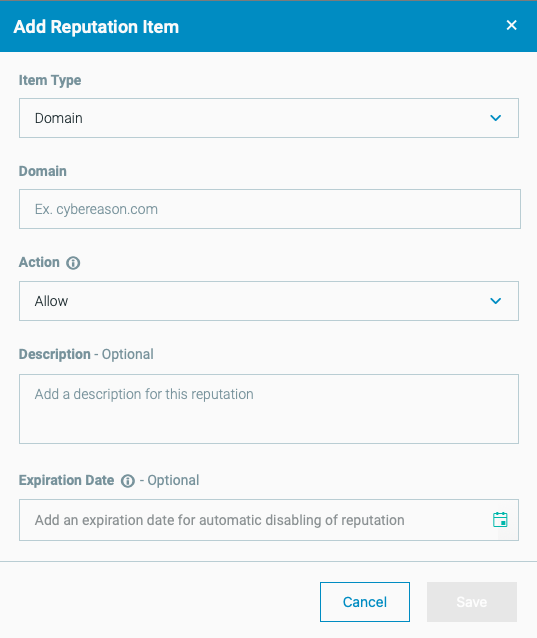
Select the type of item you want to add.
Add the value, such as the domain name.
For the EDR Action, select an action. Options include:
Allow: The platform does not trigger a MalOp when it encounters this item.
Detect Only: The platform triggers a MalOp when it encounters this item.
Detect & Prevent: The platform triggers a MalOp when it encounters this item. In addition, the platform prevents the item from executing.
Note
If you have Cybereason XDR in your environment, you cannot set a value for the XDR Action. Cybereason XDR sets this value when performing a response action in an XDR MalOp.
(Optional) Add a description.
(Optional) Add an expiration date. The expiration date is the date at which the item will be removed from the reputation list. The date displayed in the UI reflects the local timezone.
Note
Because the platform checks the expiration date every few hours, the item may not expire on the exact date that you specified.
(Optional) If you have sensor grouping enabled in your environment, in the Group restrictions section, select Assign to specific/multiple groups to specify a group or groups to which to assign the reputation. If you want the reputation to apply to all groups, select Assign to all local user groups.
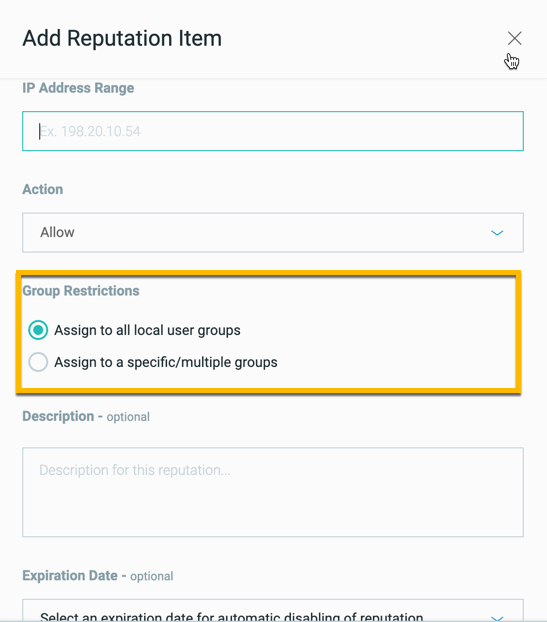
You can only add the reputation to groups to which you have been assigned.
Note
If the item has been assigned a reputation in another group that is different from your reputation, the Cybereason platform notifies you of the conflict and you must update the reputation.

Click Save.
If two or more hash values point to the same item, the Cybereason platform will combine these values into one record in the custom reputation list. For example, if a file’s MD5 hash is marked as allowed and you allow an SHA-1 hash value that points to the same file, the platform will add the second hash value to the existing record instead of creating a new entry in the reputation list. Furthermore, when a file runs on a sensor, the sensor calculates the MD5, SHA-1, and SHA-256 values for the file. The platform will add the file hash values that match with the existing hash value (if the existing hash value is in the list of custom reputations).
Edit or delete an item
To edit a reputation, select an option from the drop-down menu in the Action column.
To edit the properties for an item, follow these steps:
Select the checkbox to the left of the item. The Edit button appears above the list.
Select Edit and make your changes.
Click Save.
To delete an item from a reputation list, follow these steps:
Select one or more check boxes to the left of the items. The Delete button appears above the list.
Note
Use the Shift key and select two check boxes to activate all check boxes between the two selected.
Select Delete.
Confirm deletion.
Manage reputations in bulk using a CSV file
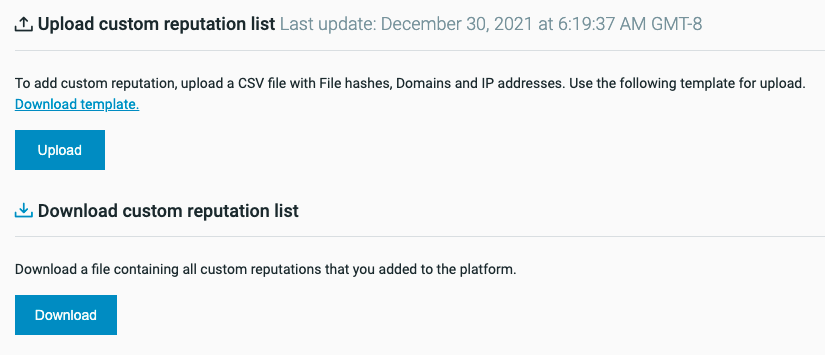
You can manage reputations in bulk by uploading a CSV file that contains reputation information. You can download a CSV template to get started, or download your current reputation list to make updates. These files are available in the Reputation screen, as shown in the following images.
In the Custom Reputation List screen:

In the Reputations screen (legacy):
Important
Cybereason is in the process of changing the terms “blacklist” and “whitelist” to “blocklist” and “allowlist”, respectively. Currently, these changes are not reflected in the CSV template and you must use the terms “blacklist” and “whitelist” when updating reputations in bulk.
The CSV template file includes the following columns:
Column |
Description |
|---|---|
Key |
The item’s IP address, domain, or hash. Values entered in this column are case-insensitive and are saved by the system in lowercase. |
Reputation |
The reputation you are applying to the item. Enter whitelist to add or remove the relevant item to the allowlist. Enter ‘blacklist’ to add or remove the item to the blocklist. You specify whether to add or remove the item in the Remove column. |
Prevent execution |
An option to prevent the item’s execution. You must have Application Control enabled for prevention to work. This option is only applicable for file hash keys. |
Comment |
A comment related to the reputation classification. |
Remove |
Indicates whether or not the item should be removed from the list specified in the Reputation column. True means the item should be removed from the specified list. False means the item should stay on the list, or be added to the list if the item is a new entry. |
Group id (version 23.1.44 and later) |
The sensor group or groups to which to assign the item’s reputation. You must have permissions in the selected groups to assign a reputation to that group. |
Expiration date |
The date and time, according to UTC, on which the platform will remove the item from the reputation list. The date must be in the following format: yyyy/mm/dd/hh/mm/ss. |
The columns in the CSV template are slightly different from the columns in the Custom Reputation List screen. The following table describes how the CSV columns correlate to values in the UI:
UI Values |
CSV Values |
|---|---|
Value |
Key |
EDR Action: Allow |
reputation: whitelist Remove: ‘False’ |
EDR Action: Detect |
reputation: blocklist Prevent execution: False Remove: False |
EDR Action: Detect & Prevent |
reputation: blocklist Prevent execution: True Remove: False |
Description |
Comment |
Group Assignment (version 23.1.44 and later) |
Group ID |
Expiration Date (local time) |
Expiration Date (yyyy/mm/dd/hh/mm/ss format and UTC) |
Created by |
N/A |
Note
On Mac, editing the CSV using the Numbers application may cause the CSV to have an unsupported format. Cybereason recommends using TextEdit or editing on Windows instead.
To add or remove items in bulk, follow these steps:
Download your reputation CSV file from the Reputations screen. If you are adding items for the first time, download the reputation list CSV template.
In the CSV file, specify the key for the item to add or remove from a reputation list in the Key column of the CSV file.
In the reputation column, specify the reputation list to which you want to add or remove the item in the Key column. Enter whitelist to prevent the item from triggering a MalOp, or blacklist if you want the item to always trigger a MalOp. See the Important note above for an explanation of CSV terms.
In the remove column, specify whether or not the item in the Key column should be removed from the reputation list specified in the Reputation column. Enter false to add the item, or true to remove the item.
In the prevent execution column, specify whether or not you want the Cybereason platform to prevent the item from executing.
Optionally, in the expiration date column, specify a time and date to remove the item from the reputation list. When editing this value in the CSV column, use the following date format: yyyy/mm/dd/hh/mm/ss.
Note
In the CSV file, the expiration date uses Coordinated Universal Time (UTC). The platform translates this time to local time in the UI, however you must specify the UTC date/time in the CSV file.
From the Reputations screen, upload the revised CSV file for your changes to take effect.
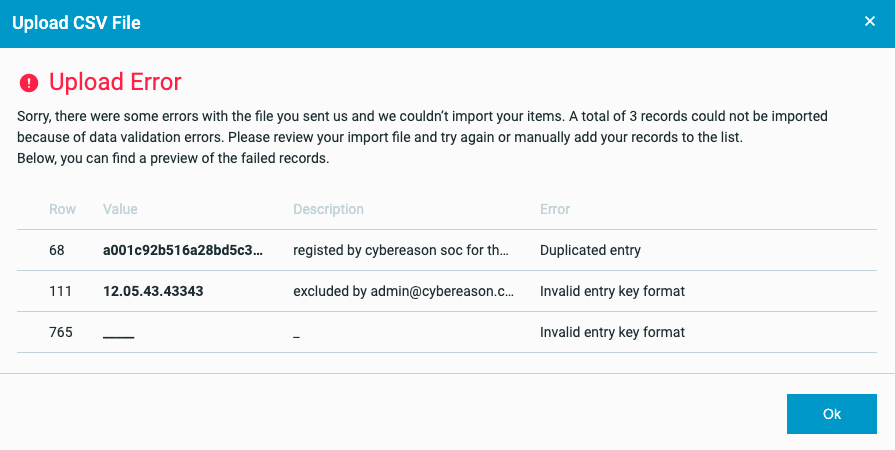
The Cybereason platform validates the values in the CSV file and presents an error message if items are invalid. For example:
CSV Example
In the following example, the Cybereason platform will remove the hash 3f63e9f09fe59f5 from the reputation list. The platform will add the IP address 198.20.10.54 to the reputation list and trigger a MalOp when it encounters the item.
key |
reputation |
prevent execution |
comment |
remove |
|---|---|---|---|---|
3f63e9f09fe59f5 |
whitelist |
FALSE |
my comment on hash |
TRUE |
198.20.10.54 |
blacklist |
FALSE |
my comment on ip |
FALSE |
Note
If an item already exists in a list, the configuration in the CSV file will replace the current configuration.
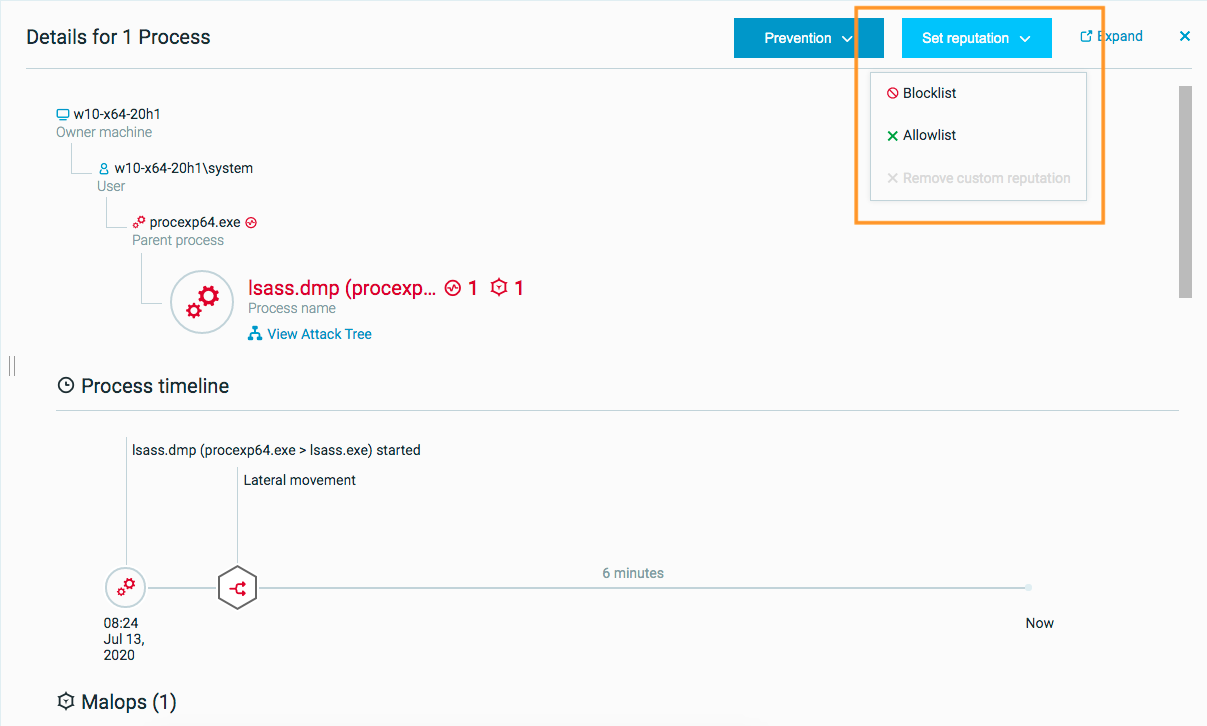
Manage reputations from the Element details screen
You can also set the reputation for a single item from the Element details pane in the Investigation screen. You can access an item’s element details from the Malop details screen in the associated MalOp, or by building a query in the Investigation screen.
Access an item’s Element details pane from the Malop details screen
If needed, from the Malops management screen, select the MalOp associated with the item you want to add or remove from the allowlist or blocklist. The Malop details screen appears.
From the Process tab, select the process to add to or remove from the allowlist or blocklist, and click the Investigate button. The Investigation screen appears with the query populated to show the selected process.
Click the process in the query results list to bring up the Element details pane.
Access an item’s Element details pane from the Investigation screen
Build a query to search for the item you want to add to or remove from the allowlist or blocklist.
From the query results, select the item to bring up the Element details pane.
Set the reputation
On the top right of the Element details pane, click Set reputation, and select whether to add the item to the allowlist or blocklist, or remove the reputation of the item.
Important
The blocklist is for detection purposes only. Adding an item to the blocklist will not prevent that item from executing. See Prevent File Execution with Application Control for details on preventing execution.
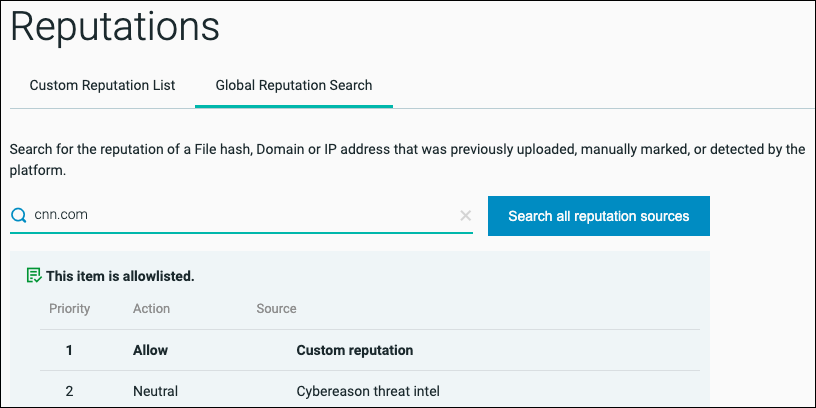
Search reputation information
All analysts, including local analysts, can search for IOCs that currently exist in the system and verify the reputation.
To search for an item’s reputation, do one of the following from the Reputations screen:
To search within your organization’s private reputations list, enter the MD5, SHA-1, or SHA-256 file hash, domain, or IP address in the Custom Reputation List tab Find reputation field.
To search across all reputation sources, enter the SHA-1 file hash, domain, or IP address in the Global Reputation Search tab search field, and click Search all reputation sources.
Note
The global file hash search function only support SHA-1 values. When searching within your custom reputation list, you can use SHA-1 or MD5 values.
The search result displays the item reputation according to each reputation source. The Priority column lists which reputation decision takes precedence over others, where 1 is the highest priority.
Custom reputation: The reputation based on your environment custom reputation list.
AV Reported: The item reputation based on the Cybereason Anti-Malware feature.
Cybereason threat intel: The item reputation as determined by the Cybereason Global Threat Intel server.